


by Rabbi Noah Gradofsky
Disclaimer: The opinions expressed here are that of the writer and do not necessarily represent the views of the Union for Traditional Judaism, unless otherwise indicated.
As someone who does not carry on Shabbat, I personally think the Shabbat (Shabbos) key belt is one of the best inventions out there. For those who are not familiar, in areas where one may not carry on Shabbat, they key belt makes the key(s) a functional part of a belt, so one may wear the belt on Shabbat and therefore take keys when one goes out.
Unfortunately, while there are some elastic Shabbat key belts readily available for purchase (for instance this search on Amazon), these belts are not exactly fashionable and maybe aren’t completely functional as belts. I used to be able to find nicer leather Shabbat belts but have struggled to find them of late. There is one place in Jerusalem that offers them, but currently they are not shipping.
So, as my last Shabbat key belt started wearing out, I started to wonder if I could make my own. Here’s what I came up with. It seems to work pretty well. Note that I am not the crafty sort nor an expert in Amazon shopping, so if people have suggestions on how to improve on my method, please put them into the comments on this YouTube video or send me an email.
Also please note that UTJ is a participant in the Amazon Services LLC Associates Program, an affiliate advertising program designed to provide a means for sites to earn advertising fees by advertising and linking to Amazon.com. So, if you use my method, or just want to express your appreciation, please follow the links below before making purchases on Amazon. Note that purchases do not need to be of specific items listed on our website in order to generate revenue for UTJ.
So, for staters, what we want is a removable buckle belt where the buckle area has snaps or something else that can be opened to replace the buckle. Here is a link to the belt I used. For more options, search Amazon for “removable buckle belt,” or if you want a belt with two keys, search for “removable buckle belt double prong.” Another effective search is “no buckle belt.”
Next, you need something that you can use as a belt buckle that you can easily add and remove keys to and that will keep your keys securely attached. I used this carabiner with a screw lock. To find other options, try searching for something like “rectangular carabiner.” You will want to make sure that you find a carabiner that is thin enough that your keys will fit on (my keys have a hole on top that is about .5cm (.197″) in diameter). Also, you’ll want a carabiner that is long enough to go around the belt you purchase and wide enough that your key will be able to swing all the way down so that the functional part of the key rests on the carabiner. A carabiner of at least 1.5″ x 1″ seemed to do the trick.
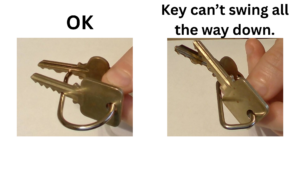
Once you have this material in hand, follow these steps:
| Open the belt and remove the buckle. | |
| If there is a removable loop that the belt goes into near the buclke, make sure that you keep that around. | |
| Grab your carabiner and put your key(s) onto it. If you’re setting up two keys, as you put the keys on the carabiner, make sure the teeth are pointing the same way. If the locking mechanism is too big for your key to get over, you can put both keys in on the same side and move one of them all the way around. |
This next part I may make a bit more difficult than it needs to be, but I think it will be the most clear for those who, like me, are not necessarily the greatest at spatial reasoning.
| Insert the key(s) into the hole(s) that the belt buckle’s pin(s) came out of. Insert the key(s) into the inside side of the belt so they stick out into the side of the belt that shows. The teeth of the key(s) should be pointed toward the end of the belt. | |
| Pull the key(s) all the way through. | |
| Thread the tip of the belt through the carabiner and snap it down, keeping the belt loop between the first and second snaps, of course. |
Finally, we’ll have to do some cutting to allow the keys to fit through the belt.
| Start putting the belt on to identify the hole(s) that you want the key(s) to go through. | |
| Once you have identified the hole(s) you want to use, you will need to make the hole(s) a bit wider for the keys to fit. The way I’ve done this is by forcing one side of scissors through the hole until it starts extending into the hole. You probably only need to cut a little bit and can then push the key(s) through to complete the opening. | |
| The belt should be ready to put on like a regular belt! |
| One final pro tip: When taking the belt off, rather than trying to pull the end of the belt back enough to get past the keys, it may be easier to push the inside of the belt in (i.e. tightening the belt on your waist) which will make the keys stand up straight and make it easier to pull the belt off of the keys. |
Enjoying UTJ Viewpoints?
UTJ relies on your support to promote an open-minded approach to Torah rooted in classical sources and informed by modern scholarship. Please consider making a generous donation to support our efforts.









Ordained by the UTJ’s Institute of Traditional Judaism in 2004, Rabbi Noah Gradofsky has remained a steadfast member, serving for years as a member of the UTJ Executive Board, the board of Morashah - UTJ's rabbinic fellowship - and as chairman of the UTJ conference committee.
Rabbi Gradofsky served as a full-time rabbi at Temple Israel in Long Beach, NY, for 6 years and has since served a number of synagogues on a contract basis. He is also a full-time practicing attorney.
Rabbi Gradofsky is also a moderator of the UTJ Facebook group, and he is a prolific writer on Jewish law and sociological topics affecting the religious Jewish community. Among his essays and writings are:
To learn more about Rabbi Gradofsky and access any essays not yet included in Viewpoints, go to: www.e-ark.net
Rabbi Gradofsky is married to Dr. Melissa Klapper and lives in the Philadelphia area.